Recently, a client has been trying to improve their image rankings.
Already ranking well for many of the main keywords for pretty blue links, improving our image rankings will help us gain extra Google real estate and attract clicks away from our competitors.
This got me thinking; how can we do this at scale?
With 1000’s of keywords ranking on the first page of Google, how can we see what images are ranking for in each Search Engine Results Page (SERP)?
It would take days to go through and manually Google then screenshot them all, then send them over to designers to review…
Want to see what that looks like? Take a look at the gallery (click the images for a better view).


After a little head scratching I figured I could either set this up with one of the many scraping platforms like Sinium SEO or, maybe Phantombuster (which I currently use for a LinkedIn project I’m working on).
Instead I opted for Screaming Frog SEO Spider. Mostly because I aleady had it and know how to use it.
If you don’t already have it and want to use this method I recommend installing the free version. I don’t actually know any SEO who doesn’t have this tool.
If you don’t its great and it’s well worth the 99 pounds price tag if you want the literal swiss army knife of SEO.
But don’t worry.
You won’t need to pay for that today. Because we will be using Screaming Frog in List mode you’ll be able to add as many URLs as you want and bypass that 500 URL limit you are warned about for the Free version.
(again, I highly recommend this tool in your day-to-day activities if you don’t already use it.)
Why would you want to do this?
Well, there are a few reasons why you might want to scrape the SERPs to see an overview of them;
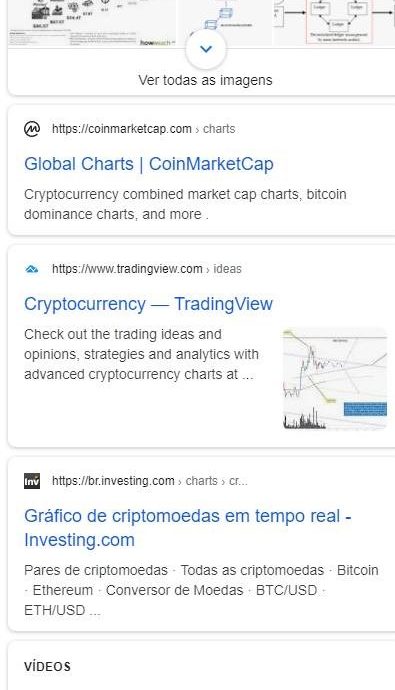
- To view at scale what images are showing in the SERPs for keywords you rank for. This allows you to understand what images google is rewarding there now and what people see in the SERP. When you have that info you can plan to stand out.
- Also, you might use it to see how Google is showing the images that appear in SERPs. For example, are they showing them in a Featured snippet in this SERP? Or, are images only in the image pack?
- Because you can and it’s a fun way to visualize the SERPs for certain keywords. It could also be good to show clients what a Google SERP looks like in one big image.
- For Screenshots that you can annotate to use for a demonstration of SERP features.
NOTE: As we will be crawling Google I do recommend that you perform the screenshotting part of this by using a VPN. If you don’t have one then get one set up from a cheap provider. But don’t do it without one. Google is known to ban IP addresses that it finds crawling it’s search results.
What Is Our Aim?
For our purposes today we will be scraping them for a competitor image analysis so that we can review the SERPs and plan to out-design our competitors.
But to do this we need to know a few things;
- What keywords is Google showing image packs and thumbnails for?
We want to focus on those SERPs where images are being used already.
Having graphic designers create new images is time consuming and expensive even if they are in-house.
Designers usually have other demands on their time. So, we want to focus our efforts in the areas where we are most likely to see a result from them.
Which leads us to the next logical question… - What kind of images is Google currently showing in the SERP?
It’s not enough to know what SERPs have images in them.
After all, most ranking tools will tell you that. We also want to know what kinds of images are showing.
Knowing what images are actually being shown in SERPs helps us in determining 2 key things;- How Googles image AI understands images related to topic by looking at the theme of the images (more on this later) and,
- What image designs are in the SERP and how we can design something that both fits our brand and website but also stands out from competitors in the SERP. With our aim to be that, standing out attracts more eyeballs, clicks and juicy backlinks for us over time.
- How Googles image AI understands images related to topic by looking at the theme of the images (more on this later) and,
There are probably many more data points we could pull from this like each images alt text, whether the image is hosted on a CDN, the Image size (in MB) or dimensions (HxW) or, how linked each image in that SERP is.
There is always more data points if we want to look for them!
But we will start with just getting basic data in this guide.
If there is more demand for further guides I’ll schedule another one. So let me know what you think at the end.
How to Screenshot Google Search Results for your Keywords
Note: For our purpose, we didn’t care who was against us.
We had a pretty good handle on who the main competitors are for us so, we really only wanted to know what kind of images Google is rewarding and how we can design something that both satisfies the user and Googles expectations but, that stands out from the crowd.
So, instead of taking manual screenshots lets fire up Screaming Frog and have a go at making this a little faster.
1. Get a list of your keywords in excel or Google Docs
You likely have a list of keywords you’re already tracking for your website already, if not, you should. So maybe get on that and come back…
For those that do use a keyword tracking tool like SEMRush or Ahrefs we’re going to filter and download.
In Ahrefs you’ll want to;
- Login and go to your project for your website
- Go to your rank tracker
- When in rank tracker click the “SERP Features” drop-down
- Un-select everything except image pack and Featured Snippet. Because images can appear in the FS too and sometimes they are not yours (even if you have the featued snippet) we want to check these also.
- Export that list
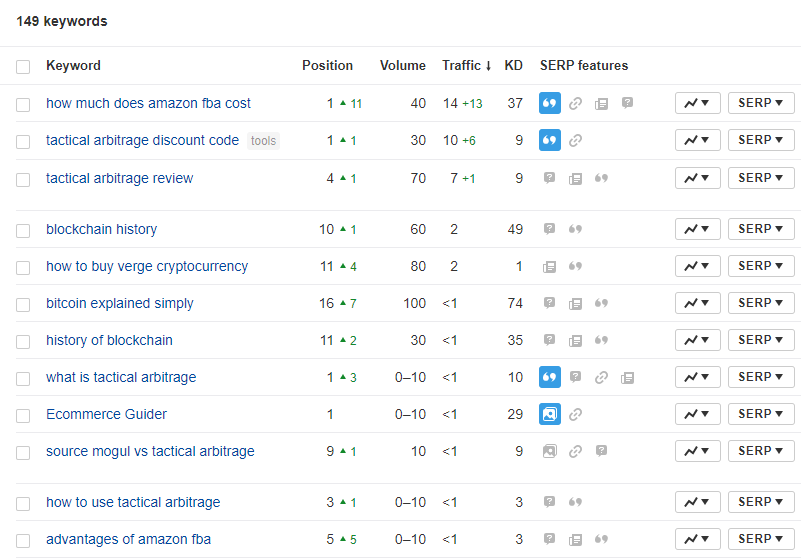
If you use any other tool to manage your keywords then I will have to trust that there is a guide out there for you or your know how to do it as I can’t cover all here.
Now you have downloaded that list you have answered Question 1. What keywords is Google showing Images packs for in SERPs?
Next up, we get into some excel/google docs magic.
2. Create your Google URLs
In an upcoming step we will be using these Google URLs in Screaming Frog. We can’t crawl these at scale if we don’t have a list of targets for Screaming Frog to go after.
Now lets create them! Creating these URLs is formulaic (literally).
- First insert a few new columns or copy and paste those keywords into a blank sheet.
- Select that list and use Find and Replace
- Find any spaces ( ) and replace them with %20
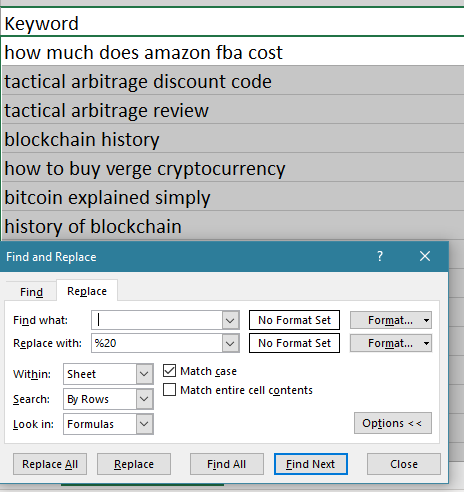
- Next find any apostrophes ( ‘ ) such as in don’t or in Patrick’s and replace them with %27
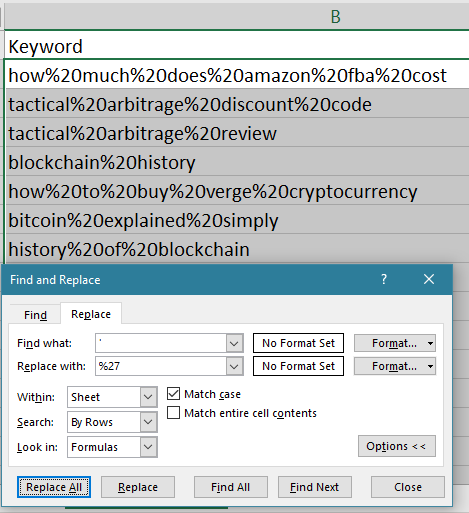
- Now you’ve done that in cell B2 paste in the following as text not a link or formula
https://www.google.com/search?q=- Now in cell C2 paste in the formula below. This will generate for you a Google search URL which you’ll need later.
=$B$2&A2- Drag that down your entire list you should get a list that looks something like this;

After you’re done, you’re ready for the next step!
3. Set Up Screaming Frog for Screenshots and Crawling Google.
Now, open Screaming Frog and set it to list mode
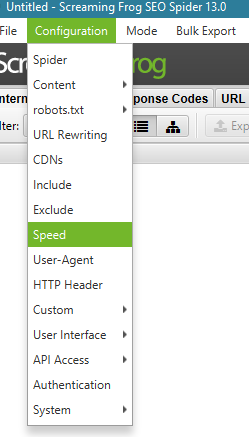
- Go to Configuration -> Speed and set the speed to; 1 Max thread and 0.5 Max URL/s
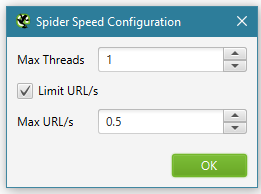
This might be slower than it needs to be but, in my opinion better to be slow and done right than get flagged and have half the data missing later on.
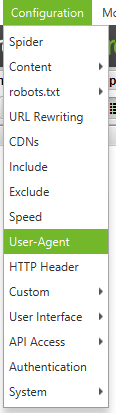
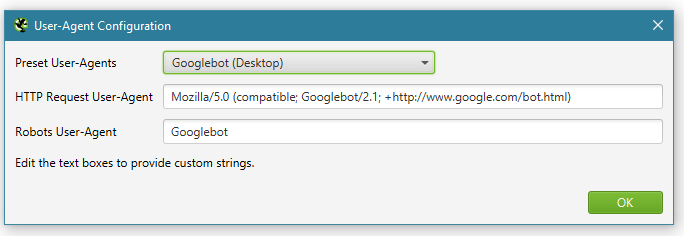
- Now, go to User Agent by selecting; Configuration -> User Agent
- Select either Googlebot (Desktop) or Googlebot (Smartphone) whichever is preferable to you.
Not all sites have a predominant amount of Mobile traffic.. yet. So if you’re not sure, check where most of your Google traffic comes from in Google analytics it’s likely more useful to adapt for that.
- Select either Googlebot (Desktop) or Googlebot (Smartphone) whichever is preferable to you.
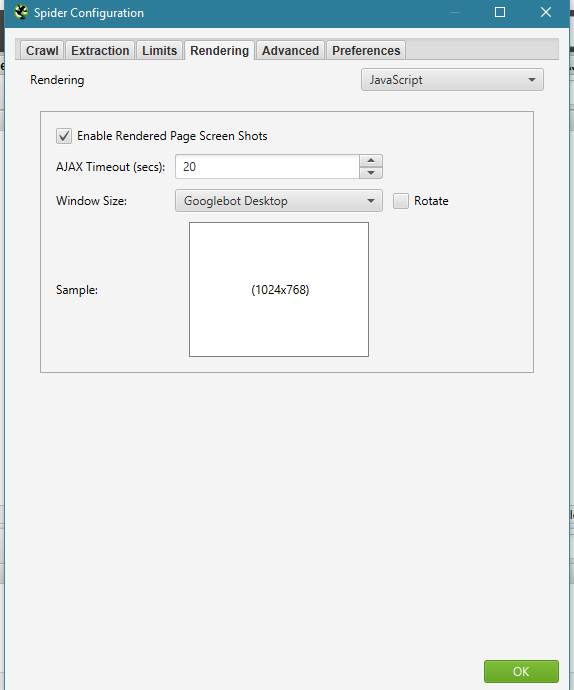
- Now here is the most important step – make sure you
- Click Configurations -> Spider -> Rendering
- Select Javascript
- Click enable Rendered Page Screen Shots
- AJAX timeout – Change to 20 seconds
- Window size – make this match whatever Googlebot you’re using or want to test for. Ie Desktop or Mobile Phone. Then hit OK.
4. Run a test first
To do that follow step 5 below. If you’re nervous about the results you can check a few of your images and make sure that the rendering is happening as it should.
5. Paste and Go
You should now be ready to rock’n’roll but just to be sure you might want to check a few of the URLs and make sure that you are actually getting the rendered result first. I recommend putting in 10-20 at least. It’s the same steps either way.
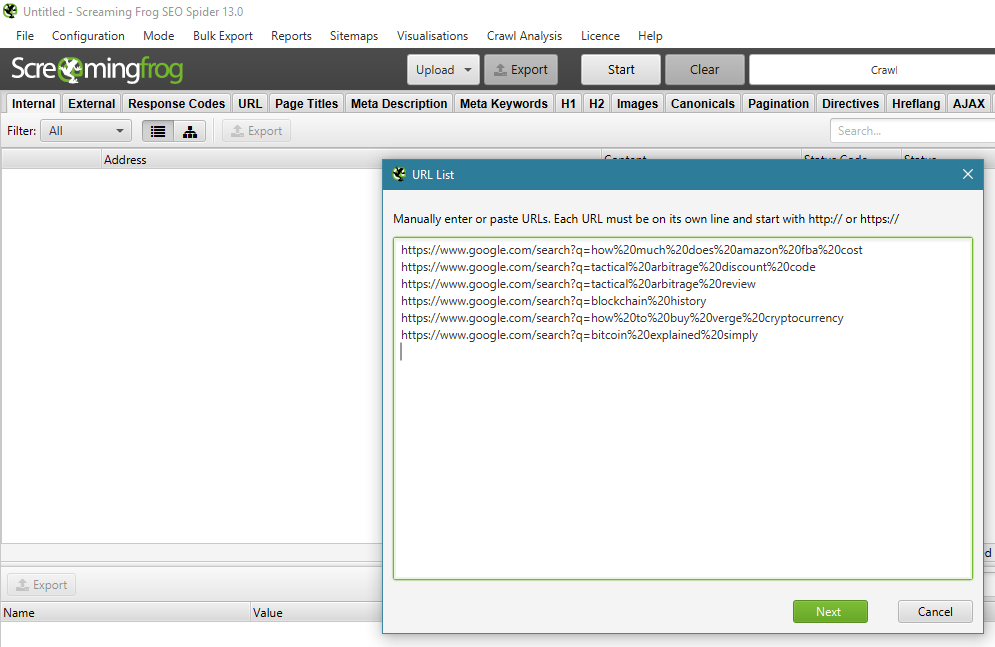
- Now click Upload -> Enter Manually
Then copy and paste in the URLs from your spreadsheet to Screaming Frog. Make sure they’re all there and then hit start.
6. Now Wait.
Depending on the amount of keywords that you have tried to check this could take a few minutes to a few hours. So sit back and let it run.
Just be wary that it will probably eat a ton of RAM so I wouldn’t plan any other RAM hungry activities while it processes. If you’re not using a powerful computer it might be best to run this overnight.
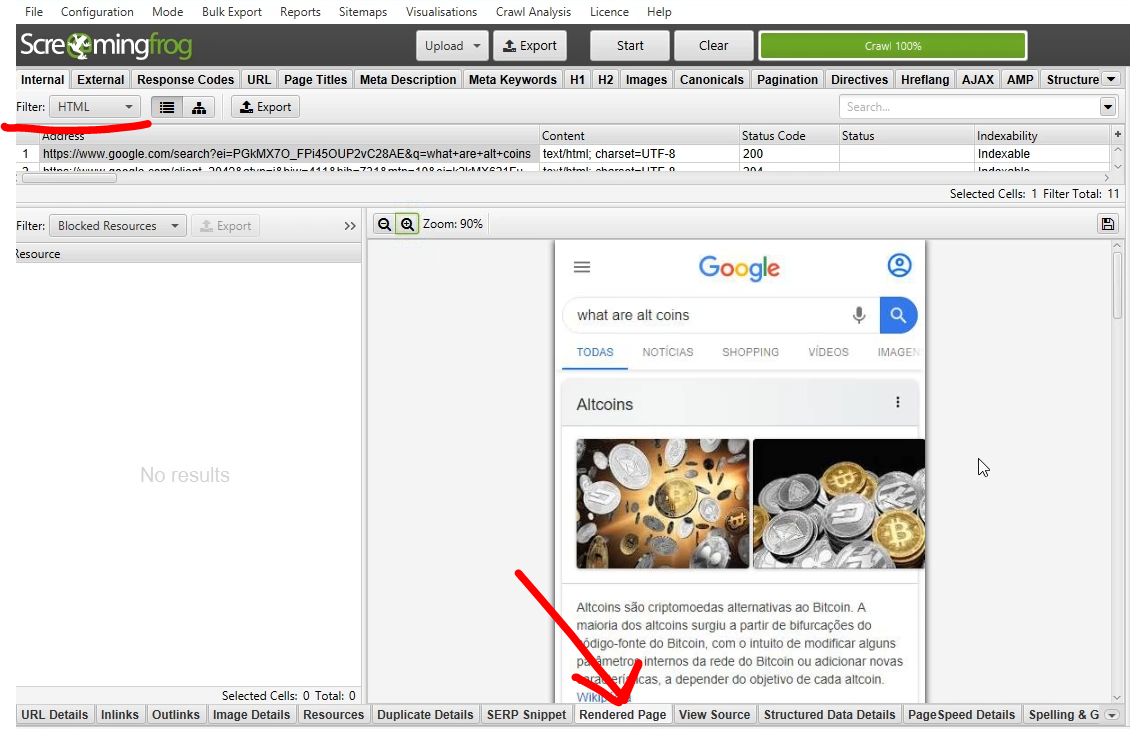
7. Review and Export
You can review your URLs before exporting them by clicking the filter in the top left nd filtering by HTML then click a URL and go to the “Rendered Page” tab at the bottom of the window in Screaming Frog.
8. Export them all and review
Once its done you can bulk export all images by clicking the bulk export tab and selecting “screenshots”
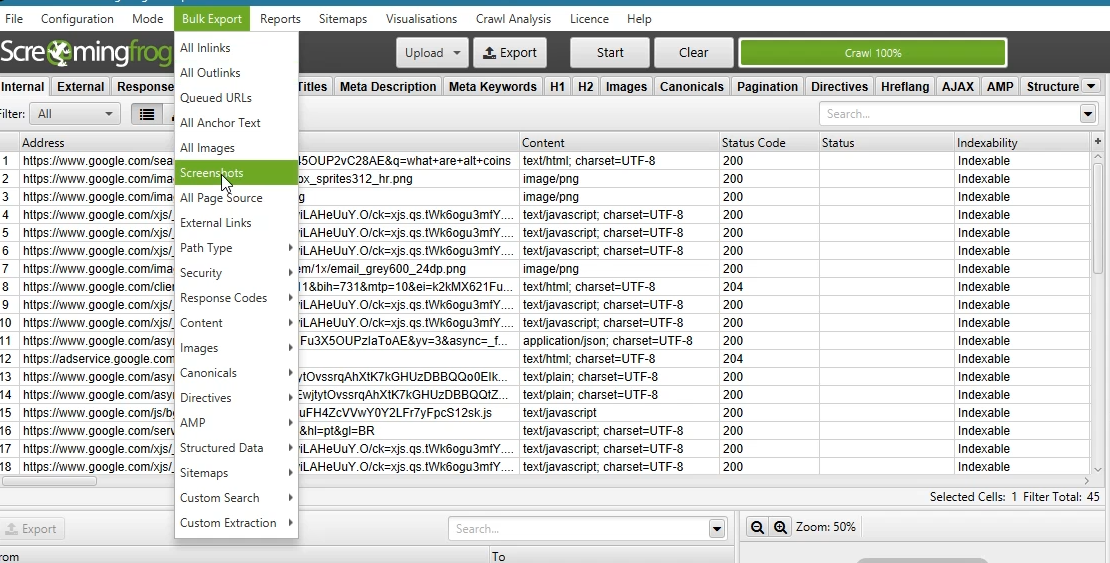
Now you can review them on your computer.
Be warned it will bulk export them all into whatever folder you choose. No zip folder or sub-folder is created automatically so, it’s best to create a new folder so the images are easy to locate.
Now you should have all of those images in a folder and can peruse them at your leisure.
Send them off to your designer with some instructions on branding and get them started on some new images that make your brand stand out in the SERPs.
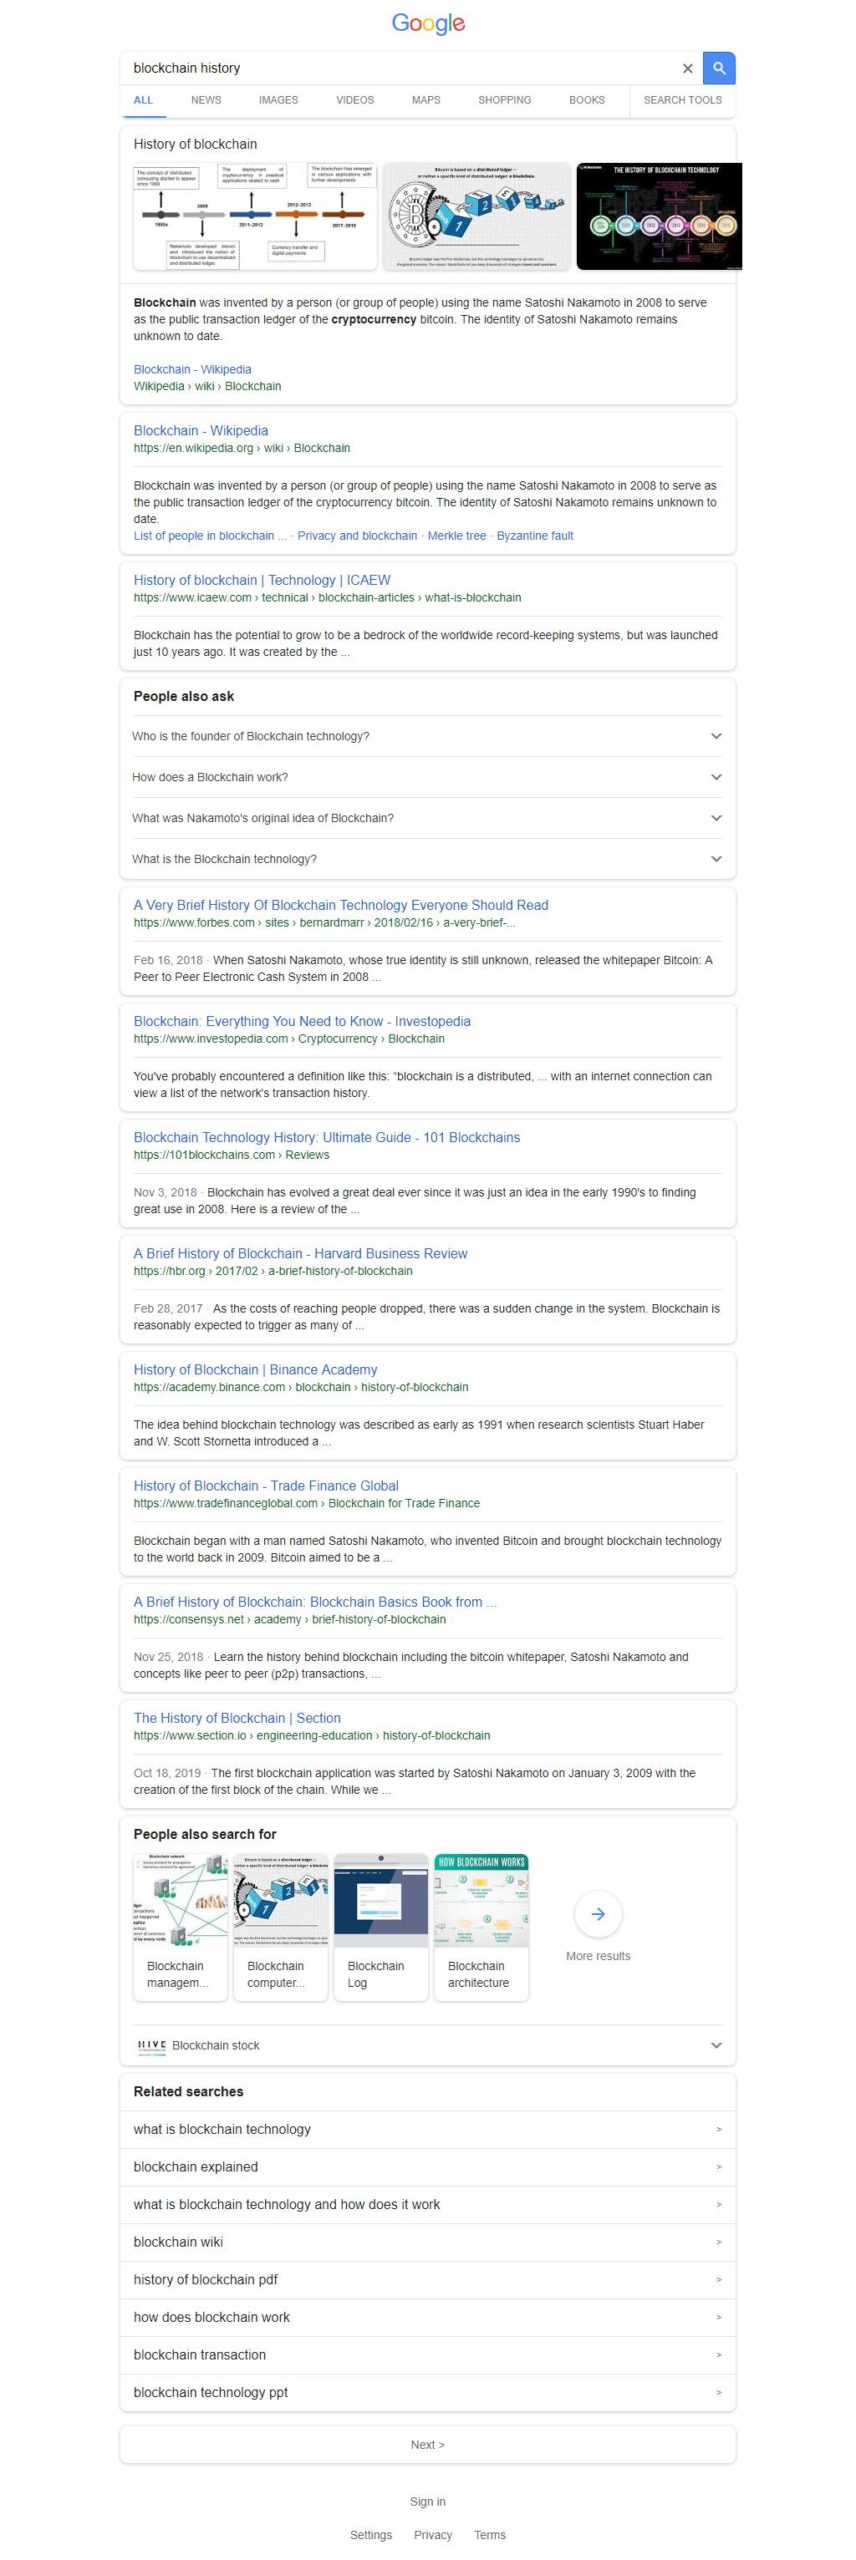
Here is a full page example screenshot of what you should get out of a scrape like this;
That’s all! If you have a project you’re working on or want some help with this one then let me know I’d be happy to do a write up or lend a hand 🙂